Widespread wisdom declares that cartridges handloaded with attention to every detail can make a regular hunting rifle shoot as true as a target rifle. To determine if all that effort is worth it, I handloaded a meticulously prepared batch of cartridges and another lot using only the most essential steps, then fired both sets through an ordinary Ruger M77 chambered in .25-’06 Remington that has shot very accurately for me throughout the years. Let’s see how it went.
Fully Prepared Cases
Cases uniform in every aspect require attention from one end to the other. Proper case sizing is the first step because cases with an exact fit within a chamber help to align bullets straight with the rifling; cases that have had only their necks sized provide that precise fit because the body and shoulder of cases are left in their fired position. However, a case from a cartridge fired in a rifle with rear-locking lugs may expand so much it will not fit back in the rifle’s chamber. Too, cases from cartridges fired in rifles with front-locking lugs spring back a little less each time they are fired. After a case has been fired and neck-sized a time or two, it becomes difficult to chamber and requires sizing to freely fit in a chamber.
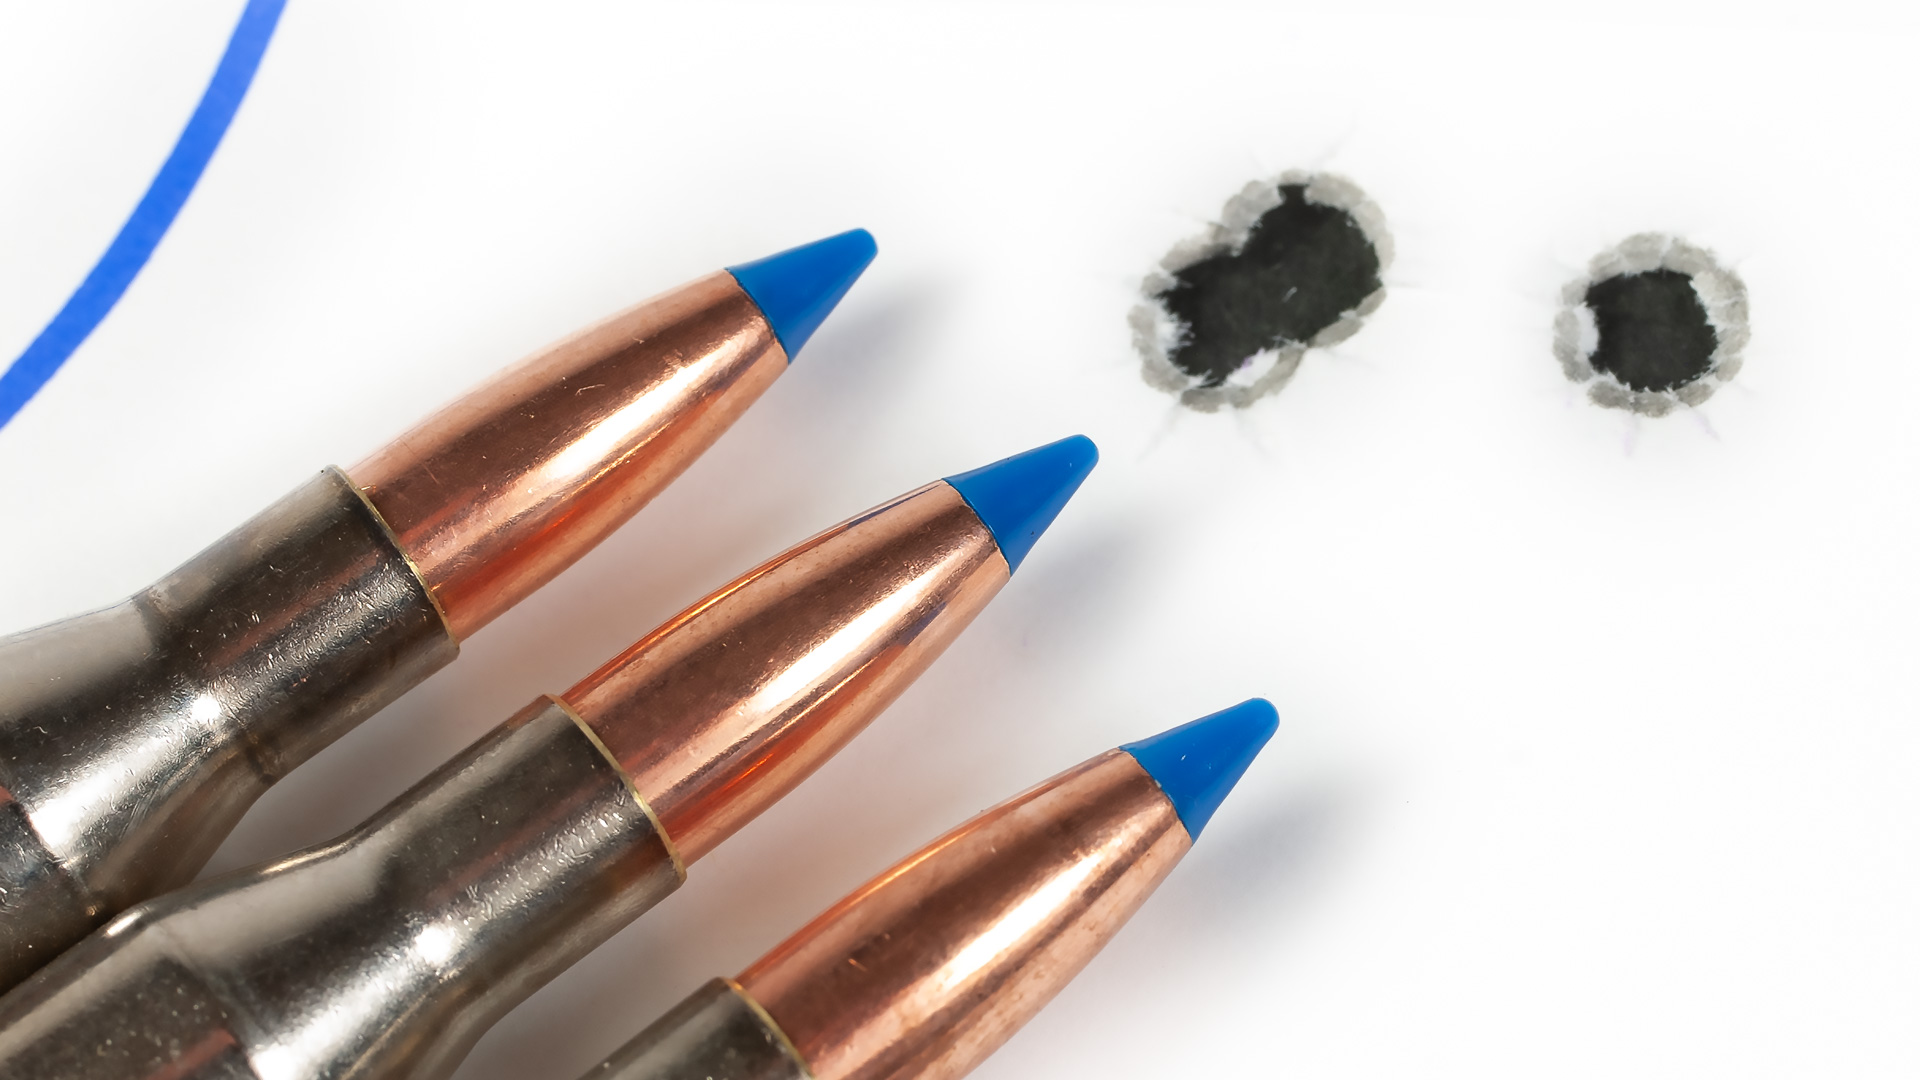
Cartridges loaded using only the most essential handloading steps can still help a hunting rifle shoot extremely accurately.
Partial full-length sizing is the key for a glove-like fit and trouble-free chambering. The Hornady Lock-N-Load Headspace Comparator tool is an easy way to set a sizing die to correctly position shoulders and slightly size the case body. The tool comes with five gauge bushings that fit on the shoulder of certain cases. Several fired cases (with the spent primer removed for an exact measurement) are measured to determine case head-to-shoulder length. Cases are sized, measured and the die turned a partial turn until the intended shoulder setback is achieved. A sizing die so set might end up in tight or slight contact with the shell holder. A shoulder setback of 0.002″ is preferred.
An alternative method is to remove the firing-pin assembly from a rifle’s bolt to enable you to feel any resistance when a case is fully chambered. A case is sized and the die turned a partial turn until no hindrance is felt on the closing bolt.
Trimming cases to the correct length is a safety issue and aids in consistent velocity. Too long a neck creates the danger of a case mouth jamming in the chamber throat and pinching a bullet when a cartridge is fired. That can cause pressures—and perhaps parts of your rifle—to go through the roof. Necks trimmed to the same length also provide an even bullet release and, if desired, uniform case crimps on bullets.
I weighed Winchester .25-’06 Rem. cases that had been partially full-length sized and trimmed after being fired once in my Ruger M77. The cases varied between 182.9 and 187.8 grains, and those between 184.1 and 184.5 grains were selected to load fully prepared cartridges, as cases of uniform weight ensure they contain the same internal volume—which contributes to uniform propellant burn and velocity.
These cases were further pared by gauging their neck thickness and runout on an RCBS CaseMaster gauging tool. Cases varied up to 0.005″ in neck thickness, and those with 0.002″ or less variation were set aside. Neck runout of those cases barely moved the CaseMaster’s dial indicator.
Except for an occasional bad case, primer pockets in cases are uniform in depth and width. Yet some picky handloaders prefer to uniformly cut pockets so that primers seat exactly the same depth to receive the same amount of strike from the firing pin to ignite consistently. A Lyman primer pocket uniformer cut only a few flecks of brass from primer pockets of cases. A burr on the inside of the primer flash hole could possibly impede that primer flame, and a Lyman flash hole uniformer evenly cut the inside of flash holes. The uniformer, though, removed only a miniscule amount of brass.
Essential Steps
In contrast to fully prepared cases, cases that received only essential handloading steps were taken randomly from a batch of Winchester .25-’06 Rem. cases that had been fired one time in my Ruger M77. They received no other preparation than partial full-length sizing and trimming. Both batches of cases moved on to final loading.
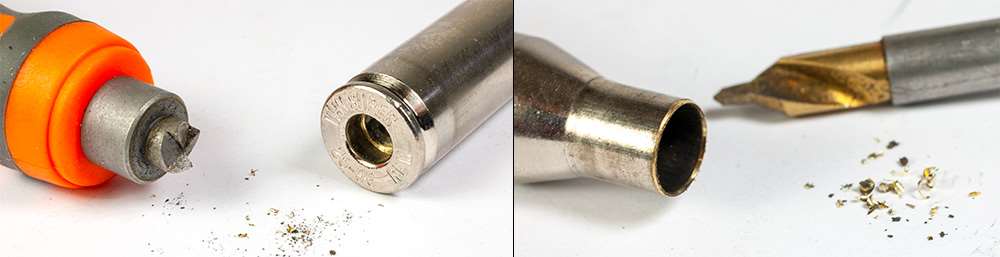
Uniform primer pockets enable primers to be seated to exactly the same depth so they are square to the impact of the firing pin. The Lyman primer pocket uniformer (l.) cut only a few flecks of brass from primer pockets of fully prepared .25-’06 Rem. cases. Likewise, a Lyman flash hole uniformer (r.) ensured a consistent primer flame in the Winchester .25-’06 cases that had already been trimmed to correct length for safety and consistent velocities.
Obviously, bullet seating is an essential handloading step. Most handloading manuals list the overall cartridge length for a particular bullet’s seating depth, and that’s a good place to start. An exact number starts by determining what cartridge length results in where a bullet contacts the start of the rifling; the Hornady Lock-N-Load O.A.L. Gauge is an easy way to find that cartridge length. A modified case for each particular cartridge threads onto the end of the gauge, a bullet is placed in the case and the assembly is inserted into the chamber. A rod inside the gauge pushes the bullet forward into contact with the rifling, and the rod is tightened. Measuring the extracted case and bullet provides an overall cartridge length where the bullet contacts the rifling. From there, the bullet is backed off the rifling the desired amount to come up with a bullet seating depth and overall cartridge length.
Such an exact cartridge length can also be determined with only a flat-tipped cleaning rod and a pen. A bullet is inserted obviously long into a fired case and together they are inserted into the chamber and the bolt is closed. (Don’t tell my dentist, but if the neck won’t securely hold the bullet, I bite the neck to slightly narrow it.) With the bullet snug against the rifling, the cleaning rod is slowly inserted into the bore from the muzzle until the tip touches the bullet. The rod is marked at the muzzle. Then, with the case and bullet removed, the rod is pushed in until it contacts the bolt face, and the rod is then marked at the muzzle a second time. The distance between the two marks is the cartridge length where a bullet contacts the rifling.
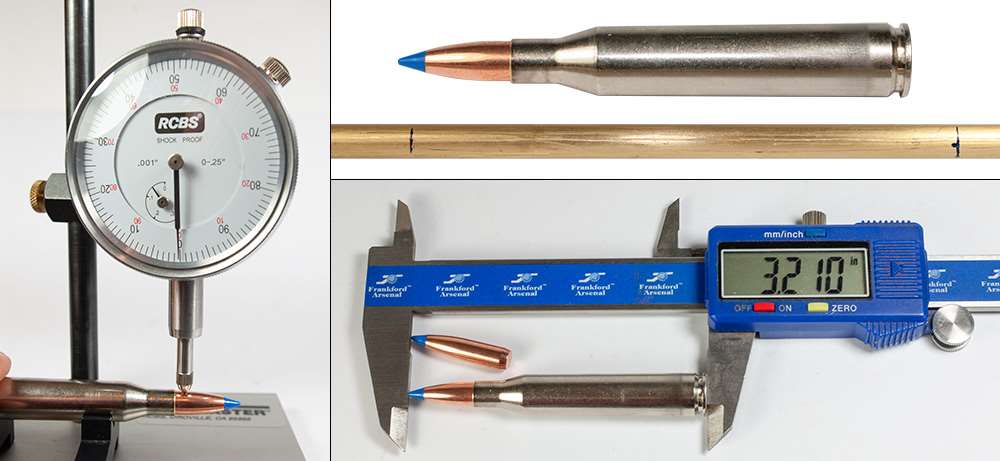
Using a flat-tipped cleaning rod and a pen (above) is an exact method for determining what cartridge length results when a bullet contacts the start of the rifling. Seating a bullet straight with the centerline of a case (l.) is an important factor in accuracy, and an RCBS CaseMaster gauging tool can measure that runout. For the .25-’06 Rem., a cartridge length of 3.210″ resulted when a Nosler 100-grain bullet was set slightly short of the rifling (below). Ideal seating depth can help produce the best accuracy, although it may take hundreds of dollars in components to find the sweet spot.
I tried each method three times with Nosler 100-grain Ballistic Tips in the Ruger .25-’06 Rem. Measurements varied with the gauge 0.007″ and the cleaning rod 0.008″. The cleaning-rod technique indicated a cartridge length of 3.218″, which was 0.007″ longer than specified by the Hornady gauge.
The Nosler Reloading Guide 7 lists a cartridge length of 3.20″ for the Ballistic Tip; to be different, I settled on a cartridge length of 3.21″. Cartridges of that length should provide reasonably good accuracy if all the other handloading step have been taken. Some obsessed handloaders, though, shoot batches of cartridges, each with bullets seated a few thousands of an inch differently, in hopes of finding that sweet spot of accuracy.
Just as important, however, is to seat bullets straight with the rifling. The work of preparing cases with little to no variation in neck thickness and runout should help seat bullets true with the rifling. Bullet runout varied mostly from nothing to 0.002″ with fully prepared cases. Bullets seated in cases that received only essential preparation varied from straight up to 0.003″. That ruler-straight seating results just as much from a clean seating die that is square and tight in a press and a seating stem that fits the bullet nose.
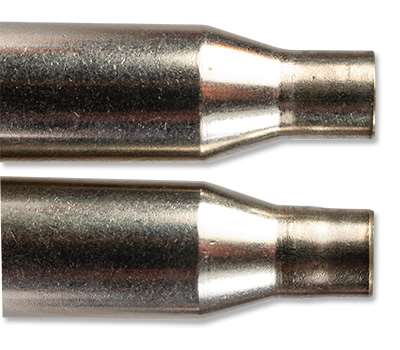
The case on the bottom has only the top half of its neck sized for a tight fit in the chamber. After firing the case a time or two, it will require more sizing for it to fit freely in the chamber. The case on the top has been partially full-length sized, with its shoulder set back a small amount.
Where to start when choosing a propellant? Handloading manuals, like those from Nosler and Lyman, indicate which propellant provides the best accuracy with a particular bullet. The Nosler Reloading Guide 7 notes Reloder 19 as the most accurate propellant tested with 100-grain Ballistic Tips shot from the .25-’06 Rem. My handloading notes show IMR 4350 and H4831 have also provided good accuracy over the years fired in the rifle. To broaden my propellant choices, I used a balance beam scale to weigh appropriate charges of Hunter, Reloder 23 and 26. Results of three-shot groups from the three loads are listed in the “Picking Propellant” table above.
Now, a three-shot group fails to show the true consistency of a load, but it does reveal if a load exhibits potential. Reloder 23 produced the best results by a smidgen over the two other propellants, so it was loaded in both fully prepared and essential-step cases. Propellant weighed on a balance scale, accurate to +/- 0.1 of a grain, was poured into cases that had been prepared only with essential steps. Propellant weight for the fully prepared cases received the extra attention of being weighed and dispensed on an RCBS MatchMaster Powder Scale Dispenser set in match mode with a resolution of 0.02 grains and accuracy of 0.04 grains.
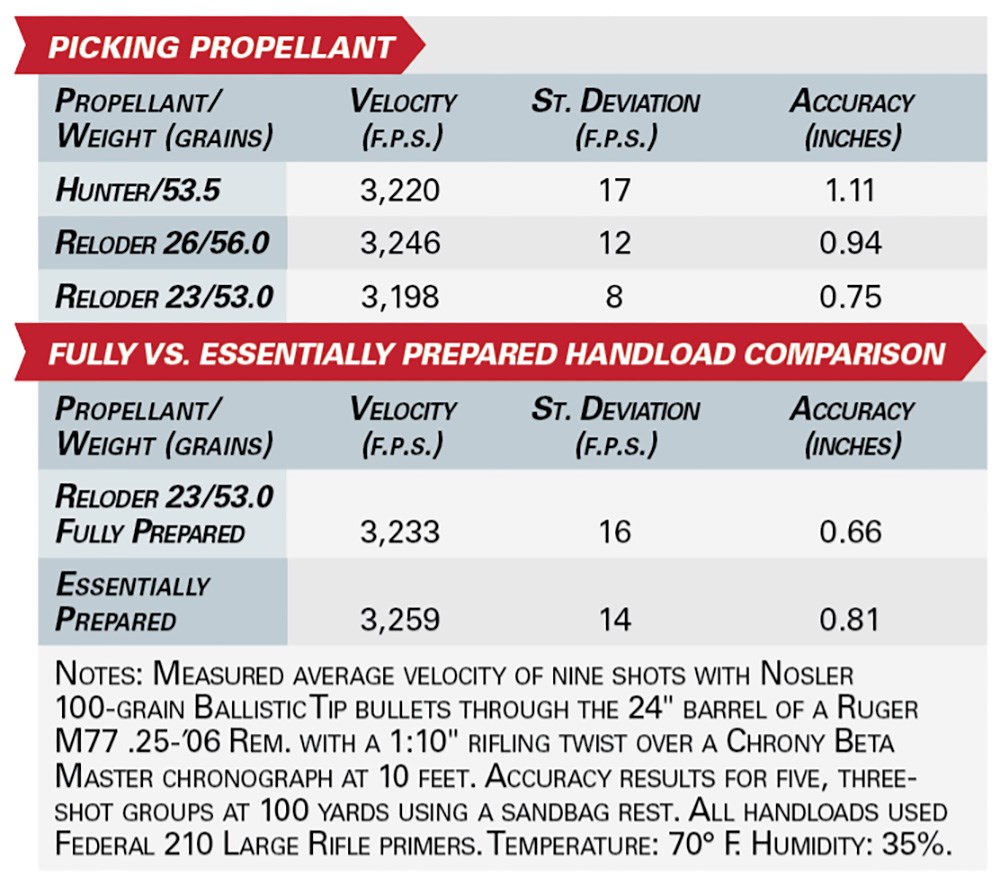
Shooting started on a calm morning with barely enough of a breeze to ruffle the peach fuzz in my ears. The first three shots fired with fully prepared cartridges landed in 0.49″ at 100 yards. The first three bullets fired from cartridges loaded with essential steps were close behind with a 0.78″ group. Alternating shooting one load then the other for five, three-shot groups for each resulted in an average group size of 0.66″ and 16 f.p.s. standard deviation of velocity for fully prepared cartridges and an average group size of 0.81″ and 14 f.p.s. standard deviation of velocity for cartridges loaded with only the essential steps.
In the end, there was no great difference in the performance of the two loads. I was more than pleased, though, with the 0.66″ and 0.81″ averages for five groups, as that level of precision is far more than is necessary for most hunting tasks. So, rest assured that performing only the essential handloading steps, done correctly, is more than sufficient for your hunting rifle to shoot its best.
Read the full article here